New facebook page!!

Hi everybody!

I have decided to create a new facebook page for my creations. I will, however, continue to update my blog (I’m not abandoning you completely!!) 
Anyway, here’s the link : https://www.facebook.com/pages/Bake-create-by-Charlotte/230439647163084?ref=hl

It would be absolutely wonderful if you could give me a like.

I know you can’t really tell, but I do spend a lot of time painting silk, and with the right exposure I would really like to sell certain pieces (there are only so many silk scarves which can fit in a cupboard!!) 

Thank you ever so much! 

Lolly (aka Charlotte) 

Back to school soon!

Only 9  days left until we have to go back to school…. I guess it’s time to start reading  all those books I was supposed to read during the holidays… To be honest, I’m not looking forward to going back. I know I should so I’ll be able to see all my friends, talk about our holidays, exercise my brain which is getting a bit dusty after practically three months of not using it at all. But what I’d really like is a couple more weeks, as I can’t really say I’ve done all the things on my summer to-do list… And during the school year I hardly get any time to do what I like anyway!

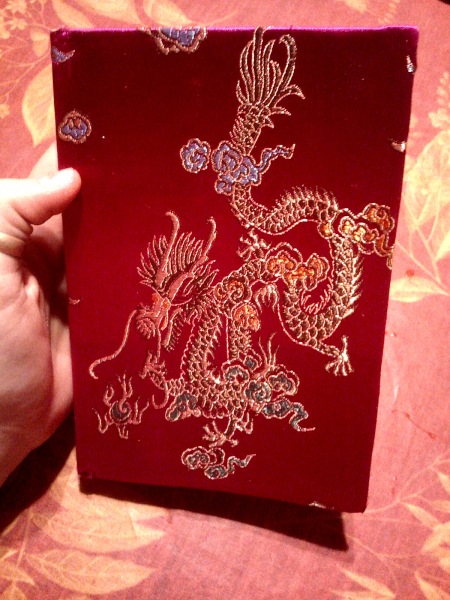
One thing I have done is buy my agenda. My sister gave me the great idea of buying a really cheap one and decorating it myself.  So that’s what I did, I bought one of those cheap one at 1 euro with the nasty cover and while I was in Japan on holiday I bought a nice piece of material. I covered the agenda with the material, using double sided cellotape and clear nail varnish so that the sides of the material didn’t fray.

So there’s an idea for you if you can’t find a decent agenda!

Mine has a dragons on it. The material changes  colour depending on the light, sometimes it’s shocking pink, other times deep red.

Photo0943

Mosaics

This is what I made with a friend of mine for our school two years ago. We were in a mosaics club run by our Latin teacher. As you can see, we made a sea shell and a starfish in mosaics on a large square  piece of wood, measuring about 70 cm diagonally. It took us a long time……. 2 and a half hours every Friday evening after school for the whole school year (then again, we probably would’ve got it finished earlier had we just sat down and done it…. but who can resist being a bit silly when you have a classroom for yourself in a practically deserted school after school hours??)

Unfortunately I don’t  have a picture of the finished product. But just imagine the last picture, without all the bits of grey cement and instead white joint between the tiles ;)

Image   Image     DSCF3816                    Image    Image

DSCF3810

Giant cupcake!

Hello! Today I give you the giant cupcake that my mum made me for my 15th birthday, nearly a year ago. Really, it was huge.

She made it by stacking normal chocolate sponges one on  top of each other with buttercream icing between each layer. Then she cut the whole thing to get it to be slightly cylindrical, like a cupcake. She baked it, iced it and, as you can’t really get a cupcake case which is bigger than your head, she cut and creased shiny paper and put it around the cake.

I can tell you, it was really delicious :)
DSC06056

Coca-cola birthday card

A friend of mine turned 16 a while ago. She collects coke cans. So, i decided to make her a coca-cola birthday card. First I searched for all different kinds of coke cans on internet, copy and pasted them onto a Word document, printed them out, cut them out.

Then I took a piece of rigid white drawing paper. I found a website which writes whatever you want in coca-cola font ( http://fontmeme.com/coca-cola-font/ ) and I copied her name onto my paper. I coloured her name, highlighted it by going round her name with white pastels and the exterior with black pastels. I sprayed the paper with fixing spray, then glued the paper coke cans around the edge of the paper.

Image        Image

Photo0385


Silk painting

I’m on holiday at the moment so I’ve been doing quite a lot of silk painting! 

I started by doing quite a lot of flowers, but now I’ve moved on to more difficult things like portraits, with a dry silk painting technique. 

I also did a normal painting. As soon as they’re steamed and the paint has fixed I’ll post the photos :) 

Chocolate île flottante

DSCF0748

Ready in 50-60 mins, serves 6, microwavable

For the crème anglaise

  • 600ml / 1 pint milk
  • 1 vanilla pod
  • 6 egg yolks
  • 100g / 4 oz caster sugar

For the meringue (the île)

  • 2 egg whites
  • 50g cater sugar
  • 1 tbsp cocoa powder

To make the custar, pour the milk into a saucepan. Split the vanilla pod, scrape the seeds out and cut the pod in three and add all of it to the milk. Heat gently, then simmer for 5 minutes.

Put the egg yolks and suger in a bowl, beat until pale and thick, then gradually whisk in the hot milk. Return the pan to the heat and heat gently, stirring all the time, until thickened. It should take about 10 mins and do not rch it or it will begin to curdle. It will not be as thick as normal custard but it wshould be just thick enough to lightly coat the back of a wooden spoon. 
Strain into a clean bowl, discard the vanilla pods, cover with cling film and chill. (can be made up to 2 days in advance)
To maje the meringue, whick the egg whites until they form stiff peaks then whisk in a third of the sugar, then another third, then the last third. When the meringue is ready it will stand in peaks that dip at the end like a bird’s beak. Sift the cocoa powder and whisk it in. Spoon the meringue into six teacups and microwave at 500W individually for 10 to 15 seconds until firm to the touch. Leave to coll..
Just before serving, spoon the crème anglaise into six glasses or dishes, invert each île flottante on your hand then slide carefully onto the crème. Scatter with chocolate curls and serve. (The desserts can be assembled and chilled for up to 1 hour before serving)

I know it’s not Christmas – but I just couldn’t help myself

I know it's not Christmas - but I just couldn't help myself


Some traditional Alsatian cinnamon biscuits which are yummy :-)

Here’s the recipe!
3 egg whites
250g / 9 oz. / 2 cups icing sugar
1 tsp grounded cinnamon
400g / 14 oz / 4 cups ground hazelnuts or almonds
 
Line the baking sheet with baking parchment. Preheat the oven to 140°C / 275°F / Gas 1 (OR if you have a fan oven 120°C / 230°F / Gas 1/2)
To make the dough, whisk the eggs whites using a hand mixer until the form stiff peaks. Sift the icing sugar and whisk in briefly. Remove 2 big tablespoons of the stiffly beaten egg whites and put to one side for the icing.
Carefully whisk the cinnamon and about 150g/5oz/1 and a half cups of the almonds or hazelnuts into the rest of the stiffly beaten egg whites. Using your hands, knead in enough of the remaining almonds or hazelnuts so that the dough is hardly sticky any more.
Roll out the dough on a work surface to a thickness of about 5mm or three sixteenths of an inch and cut out the stars (or in my case, Christmas trees) (tip/ i’s easier to cut out the stars if yu dip the cutter in water every time you cut one out) and cover them carefully with the egg whites you have put aside. The texture of the egg whites must me such that it can be spread on the stars ; add a few drops of water if necessary.
Put the baking sheet on the lowest shelf in the preheated oven. Bake for about 25mins. 
Slide the baked stars together with the baking parchment off the baking sheet onto a cake cooling rack. The biscuits should still be a bit soft soft underneath when you take them out of the oven. 

More cupcakes!

CAKE!!!

These were for a last-day-of-school Spanish lesson- they went down quite well…
I also printed out some mini Spanish flags and glued them onto little cocktail sticks and stuck them in the cakes.

Cake recipe: (makes 12)
100g / 3 and a half oz. dark choc 
175g unsalted butter
225g/ 1 cup caster sugar
4 eggs
100g / 3 and a half cups self-raising flower
2 and a half TBSP cocoa powder (more, if you dare!)
 
Preheat oven to 180°C / 350°F / Gas 4.
Melt the choc and butter in a bowl over a pan of simmering water. Remove from the heat and stir in the sugar. Cool for 10 mins.
Beat the mixture  with an electric hand whisk for 3 mins. Add the eggs one at a time, still beating. Sift the flower and cocoa powder into the bowl and beat until blended.
Divide the mixture between the cupcake cases and bake for 20-25 mins.  
 
Chocolate buttercream: (decorates 12)
135g unsalted butter — 350g icing sugar — 45g cocoa powder — 6 tbsp milk
Beat the butter until soft and smooth before adding the icing sugar and the sifted cocoa powder. Add the milk and beat for 5 mins.
Decorate the cool cupcakes with a piping bag or a spatula.
 
Vanilla cream cheese frosting: (decorates 12)
300g cream cheese (philadelphia, mascapone…..) –200g icing sugar –2 tsp vanilla essence
Mix it all together, beat it with a whisk and decorate cakes :)
 
Enjoy and let me know how you get on – send me a photo!

Cupcakes!

Cupcakes!

A quick batch of cupcakes that I whipped up today – 
 
Cake: (makes 12 cupcakes)
100g/ 3 and a half oz. dark choc
175g unsalted butter
225g/ 1 cup caster sugar
4 eggs
100g/ three quarters of a cup self-raising flour
2 and a half tbsp cocoa powder
 
Preheat oven to 180°C / 350°F / Gas4
Melt the chocolate and the butter in a bowl over an pan of simmering water. Remove from heat and stir in sugar. Beat  with an electric whisk for 3 mins. Add the eggs one at a time and, still beating the miwture, add in the flour and cocoa powder. Divide the mixture between the 12 cupcake cases and bake for 20 to 25 mins.
 
Vanilla buttercream: (decorates 12)
120g butter — 500g or 3 and a hald cups icing sugar — 1tsp vanilla extract — 1 tbsp milk
Beat the butter until smooth, add the icing sugar and beat until light. Add the vanilla extract and milk. Decorate the cooled cakes with a spatula or piping bag.
(I decorated mine by icing the cakes and crumbling some chocolate cake on top)
 
Enjoy!

Lycée des Pontonniers, my school

Hello :)
I just wanted to take the time to show you a picture of my school (it’s a french lycée, american high school or british college), taken on the bridge aver the river next to it.
The blobby bits you can see is snow, it really did look lovely but unfortunately on the picture it doesn’t seem so magical ;)

I live in Strasbourg, France and go to the Lycée International des Pontonniers. It’s like Hogwarts, minus the magic but just as beautiful :) also all the people who go there are multilingual so we all get to meet lots of people of different nationalities.

Photo0222

Don’t Blink……


Angle

I love Doctor Who. I have tons of DW t-shirts and I’m a real fan.

A while ago, I drew this picture of a weeping angel with the intention of taping it to the inside of my locker, so that when my whovian locker mate opened it he would see it and not be able to blink. Week by week, when time permitted, I would draw another angel, gradually getting closer, uncovering their eyes and smiling eerily. I’ve haven’t drawn the final picture yet (the scary, in-your-face-with-fangs one) but it’ll be coming soon :)


Also, I only took a picture of the first one. The others I’ve given away to friends but I’ll ask them for the pics so you’ll be able to see them :D


Here it is. Don’t blink.


Nail art :’)

I’m ill and not at school today, so I thought I’d take the time to share some past “creations” with you …

Behold… My nails!
I promise you that there are more spectacular things to come than this….
Such as the pac-mans I did the other day! Unfortunately I didn’t take a picture of them but I’ll redo them some time :)

Image

                                        Image

MUSE CONCERT!

MUSE CONCERT!

Here’s a photo from December the 19th when I went to see Muse for the first time in Strasbourg.
I queued from 1 o’clock in the afternoon in the cold with my friend and older sister, and they let us into the concert hall at seven o’clock.

Best night ever.